
Django デプロイ作業(Part.4)
この記事では「Djangoのデプロイ作業」の基本的な流れを「Virtual Box」を利用して行います。作業内容は以下の通りです。
ローカル側(開発環境側)での作業
- 「settings.py」を編集する
- 利用しているパッケージを「requirements.txt」に出力する
- Githubへプロジェクトをpushする
サーバー側(本番環境側)での作業
- Virtual BoxにRocky Linux を準備する
- DBMS(この記事ではPostgreSQL)のインストールと設定
- gitのインストールと設定
- Githubからプロジェクトをクローンする
- python仮想環境の準備
- gunicornのインストールと設定
- Webサーバー(この記事ではnginx)のインストールと設定
サーバー側(本番環境側)での作業
gitの準備
gitのインストールと設定
Rocky Linux 9 へのGitのインストールについてはこちらを参考にして行います。但し、インストール時のコマンドは「yum」ではなく「dnf」を利用しています。

ルートユーザーに切り替えます。
[django@localhost ~]$ su –
Password:
[root@localhost ~]# dnf install git
インストールが始まります。

途中で「Is this ok」と聞かれるので「y」と入力します。
Total download size: 14 M
Installed size: 61 M
Is this ok [y/N]:y
インストールが完了します。

デフォルトのテキストエディターの設定(この記事ではviとしています。)
[root@localhost ~]# git config –global core.editor vi
ユーザー情報の登録(下は例です。実際の情報に置き換えて入力します。この記事でもユーザー名とメールアドレスは個人のもので入力しています。)
[root@localhost ~]# git config –global user.name “John Doe“
[root@localhost ~]# git config –global user.email “john@example.com“
サーバー上にリモートリポジトリのクローン先ディレクトリを作成します。作成先はRocky Linux のインストール時に作成した「djangoユーザー」のhome/djangoディレクトリの直下にしています。名前は「pos」で作成しています。
[root@localhost ~]# exit
logout
[django@localhost ~]$ mkdir pos
posディレクトリに移動します。
[django@localhost ~]$ cd pos
プロンプトが切り替わります。
[django@localhost pos]$
接続用の鍵を生成します。
[django@localhost pos]$ ssh-keygen -t ed25519 -C “john@example.com“
Generating public/private ed25519 key pair.
次は何も入力せずにEnterキーを押下します。
Enter file in which to save the key (/home/django/.ssh/id_ed25519):
パスフレーズを入力します。忘れないようにします。
Created directory ‘/home/django/.ssh’.
Enter passphrase (empty for no passphrase):
Enter same passphrase again:
生成した鍵はユーザーディレクトリ内の隠しディレクトリ「.ssh」に保存されています。次のコマンドで鍵が存在しているかを確認します。
[django@localhost pos]$ ls -al ~/.ssh

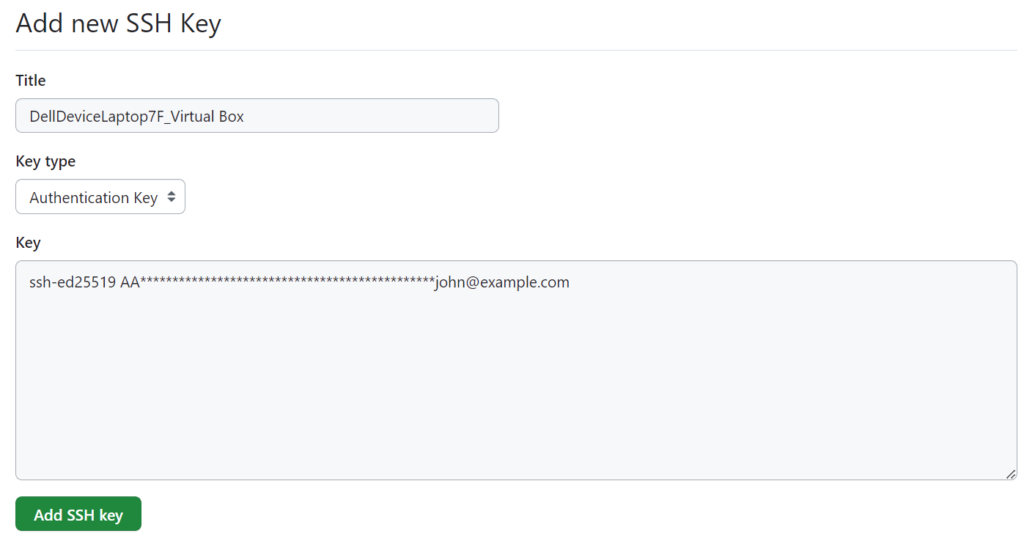
次のコマンドで鍵を表示してコピーします。(CockpitでLinux操作を行っている場合はコピーしたいプロンプト上の文字部分を選択して右クリックで簡単にコピーができます。(鍵の追加方法については次の記事を参考にしてください。)
https://howahowablog.com/connect-to-github-using-ssh/catコマンドで表示した鍵をマウスで選択して右クリック「Copy」します。
[django@localhost pos]$ cat ~/.ssh/id_ed25519.pub
ssh-ed25519 AA************************************john@example.com
コピーした鍵をGithubに登録します。

Githubへの接続ができるか確認します。ホームディレクトリから次のコマンドを入力します。
[django@localhost ~]$ ssh -T git@github.com
接続していいかを問われるので「yes」と入力します。
Are you sure you want to continue connecting (yes/no/[fingerprint])? yes
パスフレーズを聞かれます。
Enter passphrase for key ‘/home/django/.ssh/id_ed25519’:(パスフレーズを入力)
パスフレーズを入力して次のように表示されればSSH接続の設定が正しく行えたことになります。
Hi howahowablog! You’ve successfully authenticated, but GitHub does not provide shell access.
作成したposディレクトリをgitの配下に置きます。
[django@localhost ~]$ cd pos
[django@localhost pos]$ git init
hint: Using ‘master’ as the name for the initial branch. This default branch name
hint: is subject to change. To configure the initial branch name to use in all
hint: of your new repositories, which will suppress this warning, call:
hint:
hint: git config –global init.defaultBranch
hint:
hint: Names commonly chosen instead of ‘master’ are ‘main’, ‘trunk’ and
hint: ‘development’. The just-created branch can be renamed via this command:
hint:
hint: git branch -m
Initialized empty Git repository in /home/django/pos/.git/
[django@localhost pos]$ ls -la
total 0
drwxr-xr-x. 3 django django 18 Oct 14 02:49 .
drwx——. 4 django django 127 Oct 14 02:07 ..
drwxr-xr-x. 7 django django 119 Oct 14 02:49 .git
.gitディレクトリが作成されたのが確認できます。
次のコマンドで利用したいリモートリポジトリを登録します。
git remote add <URLの別名><接続先のリモートリポジトリのURL>コマンド
[django@localhost pos]$ git remote add origin リモートリポジトリのURL
次のコマンドでリモートリポジトリのプロジェクトをサーバーにクローンします。
[django@localhost pos]$ git clone リモートリポジトリのURL
Cloning into ‘Pos’…
Enter passphrase for key ‘/home/django/.ssh/id_ed25519’:(パスフレーズを入力)
remote: Enumerating objects: 216, done.
remote: Counting objects: 100% (216/216), done.
remote: Compressing objects: 100% (103/103), done.
remote: Total 216 (delta 87), reused 212 (delta 86), pack-reused 0
Receiving objects: 100% (216/216), 87.20 KiB | 273.00 KiB/s, done.
Resolving deltas: 100% (87/87), done.
以上でRocky Linux 9内にローカルで開発したDjangoのプロジェクトを呼び込むことができました。
Djangoデプロイの第4回目の記事は以上です。次回はpython仮想環境の準備からです。

ブックマークのすすめ
「ほわほわぶろぐ」を常に検索するのが面倒だという方はブックマークをお勧めします。ブックマークの設定は別記事にて掲載しています。


-1280x720.jpg)


-640x360.jpg)
-640x360.jpg)

-640x360.jpg)
-640x360.jpg)

カスタム調査とシンジケートデータ-320x180.png)
帰無仮説と対立仮設・有意水準・P値・z検定-320x180.png)
準実験:合成コントロール法-320x180.jpg)
準実験:回帰不連続デザイン(RDD)-320x180.jpg)
準実験:傾向スコアマッチング(PSM)-320x180.jpg)