Version Control (Part1-Part.11) [Git] articles are available on Amazon kindle Unlimited (e-book).
howahowablog.com will only be able to read Part.5/10/11.
Version Control (Parts 12-21) [GitHub (Part 1)] articles are available on Amazon kindle Unlimited (e-book).
Only part15/19 will be available on howahowablog.com.
Version Control (Part 21-Part.30) [GitHub (Part 2)] articles are available on Amazon kindle Unlimited (e-book).
Only Part.24/30 will be available on howahowablog.com.
Objectives of Chapter 15
Synchronize the contents of a local repository with a remote repository.
Understand the overview and operation of pull requests.
Joint development using remote repository(Part.2)
Synchronize the contents of the local and remote repositories
How to synchronize the contents of a local repository with a remote repository
When synchronizing the contents of a local repository to a new remote repository, as in this case, or when synchronizing the contents of a local repository to a remote repository after making changes in the local repository, the following operations must be performed as preparations before synchronization.
- Get the state of a remote repository into a remote tracking branch of the local repository.
- Merge the obtained state with the main branch in the local repository.
- Create a topic branch in the local repository.
- Work on topic branch and finish to commit.
- Send the contents of the local repository to the remote repository.
- Request a change confirmation in the remote repository.
- Approve the changes and bring the remote repository up to date.
※In the second operation, the main branch in the local repository and the main branch in the remote repository have different branch ancestry, so they are synchronized using options.
※The operations in “3” and “4” are part of the flow to be performed in a joint development.
Get remote repository status to local repository
Before synchronizing to a remote repository, the remote tracking branch must be kept up to date. There are two types of operations to bring a remote tracking branch up to date: “fetch” and “pull”.
If there are any differences, the system automatically checks for them and adds only the changed parts.
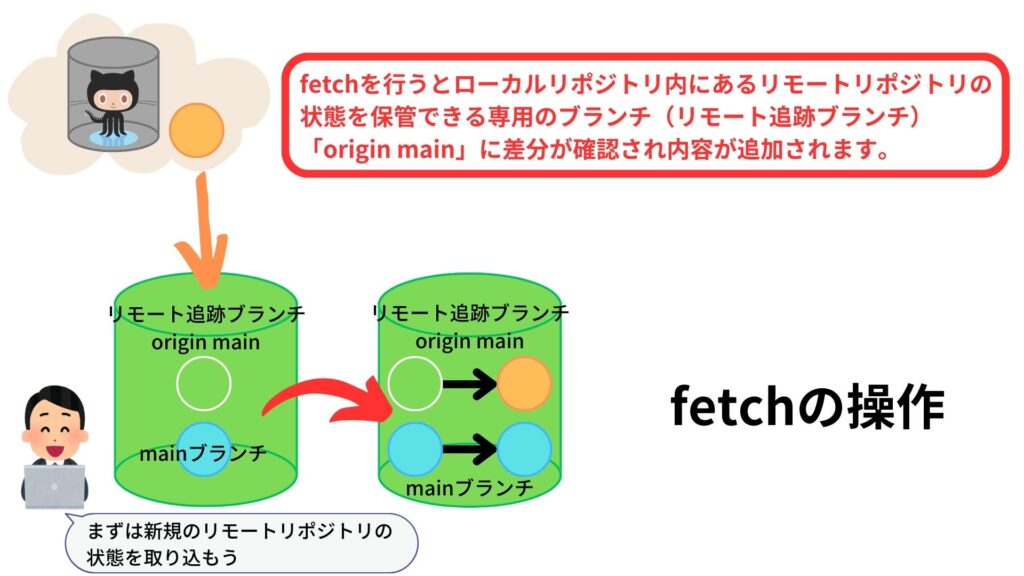
【English translation in illustration】
fetchを行うとローカルリポジトリ内にあるリモートリポジトリの状態を保管できる専用のブランチ(リモート追跡ブランチ)「origin main」に差分が確認され内容が追加されます。
→When fetching is performed, the differences are checked and the contents are added to “origin main”, a dedicated branch in the local repository that can store the remote repository’s status (remote tracking branch).
リモート追跡ブランチ → remote tracking branch
mainブランチ → main branch
fetchの操作 → Operation of fetch
【English translation of speech bubbles】
まずは新規のリモートリポジトリの状態を取り込もう
→First, let’s get the status of the new remote repository.
【English translation in illustration】
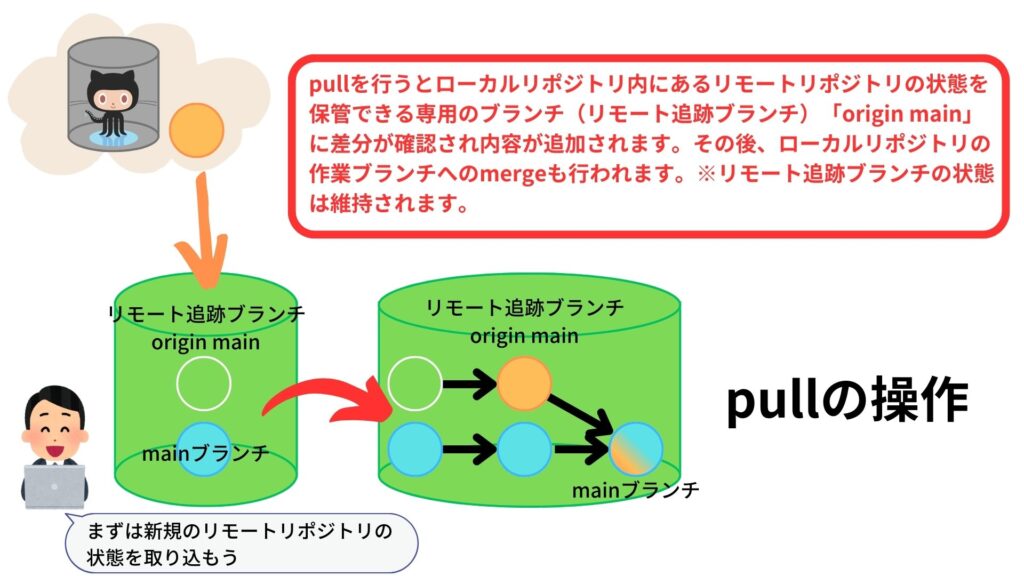
pullを行うとローカルリポジトリ内にあるリモートリポジトリの状態を保管できる専用のブランチ(リモート追跡ブランチ)「origin main」に差分が確認され内容が追加されます。その後、ローカルリポジトリの作業ブランチへのmergeも行われます。※リモート追跡ブランチの状態は維持されます。
→When a pull is performed, the difference is checked and added to origin main, a branch in the local repository dedicated to storing the remote repository’s status (remote tracking branch). After that, a merge to the working branch in the local repository is also performed.
※The status of the remote tracking branch is maintained.
Strictly speaking, the main branch is not a working branch, but a topic branch is created and edited on the topic branch.
リモート追跡ブランチ → remote tracking branch
mainブランチ → main branch
pullの操作 → Operation of pull
【English translation of speech bubbles】
まずは新規のリモートリポジトリの状態を取り込もう
→First, let’s get the status of the new remote repository.
In this book, the “fetch” + “merge” operation is used. (The result is the same as a “pull” operation.)
Some illustrations of Git branches are drawn from the perspective of the “branch” status, while others are drawn from the perspective of what the “branch” points to, which can be confusing.
This book is illustrated from the perspective of state of the branch. (main branch is “light blue” -> “light blue” -> “orange and light blue”, origin/main branch (remote tracking branch) is “white circle” -> “orange”, and so on)
Note that in the illustration of the pull operation, the main branch after merge is orange and light blue, but this does not mean that the main branch and origin/main branch (remote tracking branch) are now the same just because they have been merged.
The main branch would show “orange and light blue” with updated contents, but the origin/main branch is not moved from the orange circle as a remote tracking branch, but still exists in its orange state.
Operation of fetch. (git fetch origin command)
Import git@github.com:howahowablog/howahowaSite.git into a remote tracking branch of the local repository.

The above command means “fetch the contents of origin (an alias for the address of the remote repository) into the remote tracking branch. The remote tracking branch does not need to be specified.
Merge the obtained state with the main branch in the local repository
※In this case, the remote and local repositories have different branch ancestors (each was created as a separate new branch when it was created), so the normal merge operation cannot be performed.
In this situation, use the “–allow-unrelated-histories” option. This option allows you to merge branches that were created separately, as in this case.
Operation of merge(git merge –allow-unrelated-histories origin/main)
“git merge –allow-unrelated-histories origin/main” command can merge branches with different ancestry.

Create a topic branch in the local repository
After merging the contents of the remote tracking branch into the main branch, create a new topic branch and edited within this topic branch.
When the editing is complete (staging and commit iterations with the final commit completed), the topic branch is sent to the remote repository (push operation).
After the push operation, a branch with the same name is added to the remote repository (the orange arrow in the illustration below is the push operation).
This time, the topic branch is created as “new-project”. There are no rules for naming the topic branch this time, but we will discuss this in detail in Chapter 8.
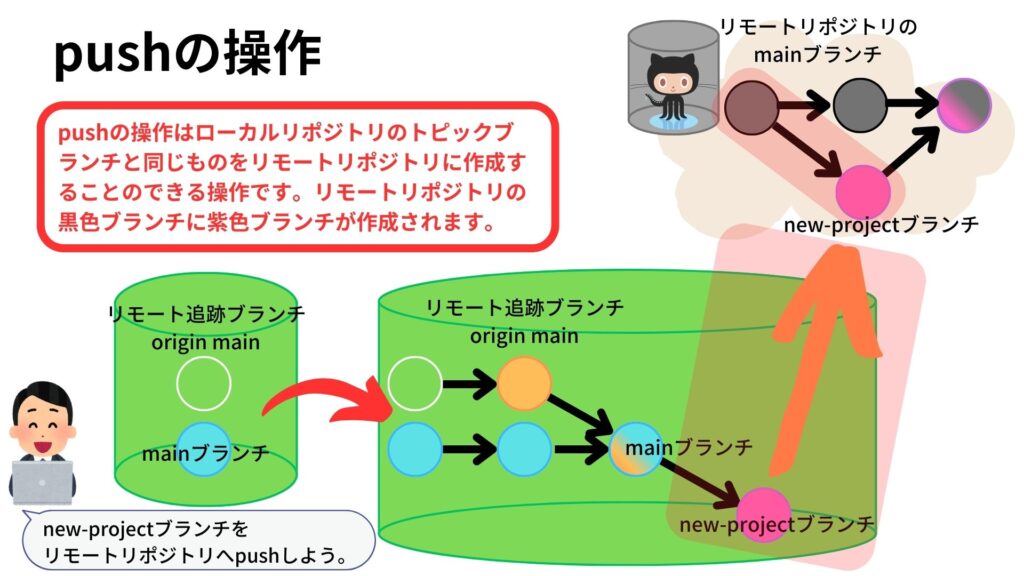
【English translation in illustration】
pushの操作はローカルリポジトリのトピックブランチと同じものをリモートリポジトリに作成することのできる操作です。リモートリポジトリの黒色ブランチに紫色ブランチが作成されます。
→The push operation is an operation that allows you to create a branch in the remote repository that is identical to a topic branch in the local repository. A purple branch is created on the black branch in the remote repository.
リモートリポジトリのmainブランチ → main branch in the remote repository
new-projectブランチ → new-project branch
リモート追跡ブランチ → remote tracking branch
mainブランチ → main branch
【English translation of speech bubbles】
new-projectブランチをリモートリポジトリへpushします。
→Push the new-project branch to the remote repository.
“git branch ‘branch-name” command
Create a new branch with the git branch command. Just after creation, the content of the new branch is identical to the original branch (in this case, the main branch).

You can view a list of branches with git branch.

※All the operations you are doing with these commands are local operations and changes on the local side. They are not GitHub changes. All newly created branches are also local operations.
There is no visual change, but you can imagine that you can now switch between the “main” and “new-project” branches in the Git-managed folders in Explorer.
Work on a branch and finish to commit
Why do we need a topping branch?” It is because the main branch is a branch that should not be polluted.
Basically, you do not update files in the main branch. You should always create a branch and work on a topic branch side.
In “Do not think hard Git & GitHub vol. 1”, we staged and committed on the main branch only as an exercise, but you should create a topic branch and do editing and updating on that branch.
Topic branches are periodically pushed to the remote repository for pull requests and review, and then merged on the remote repository.
Send the contents of the local repository to a remote repository
Confirm the procedure for sending a new branch (topic branch) to a remote repository. Switch the branch to be used to “new-project” topic branch using the git checkout command.
“git checkout branch-name” command
The “git checkout branch-name” command switches the branch to be used.

Confirm with the “git status” command that the commit is complete, and the working tree is clean.

Push the “new-project” branch to the remote repository. This operation enables you to create a pull request on the remote repository.

Confirmation of changes and request for changes, in the remote repository
From here, you will be manipulating the remote repository.
If you are using Git and GitHub together for the first time, you may be confused as to which operation you are currently using, but we distinguish local operations using “Visual Studio Code” or “Git Bush (command)” as Git operations and operations on GitHub pages using remote repositories is distinguished from GitHub operations.
If you check the top page of GitHub, you will see a “Compare & pull request” button. This button will disappear after a certain period. If it disappears, you can check it from the “Pull request” tab.
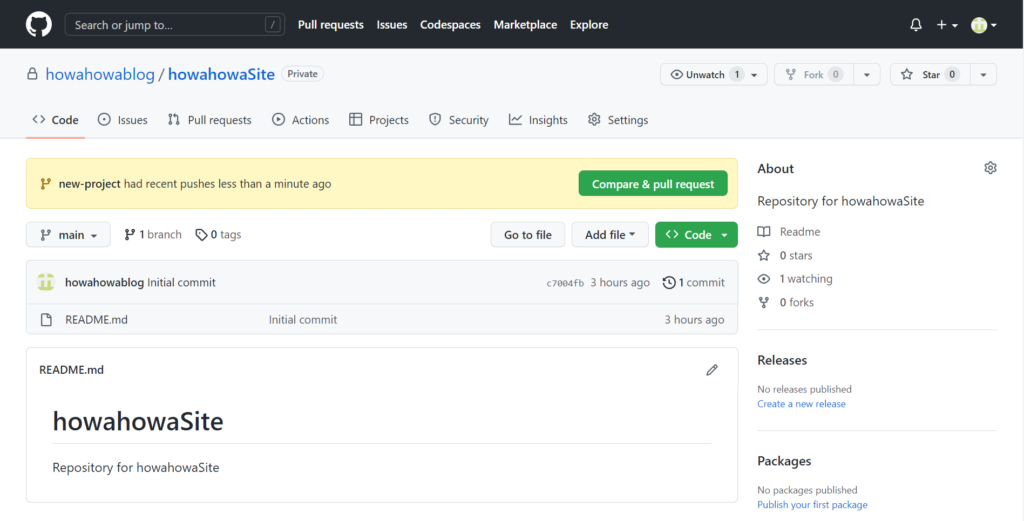
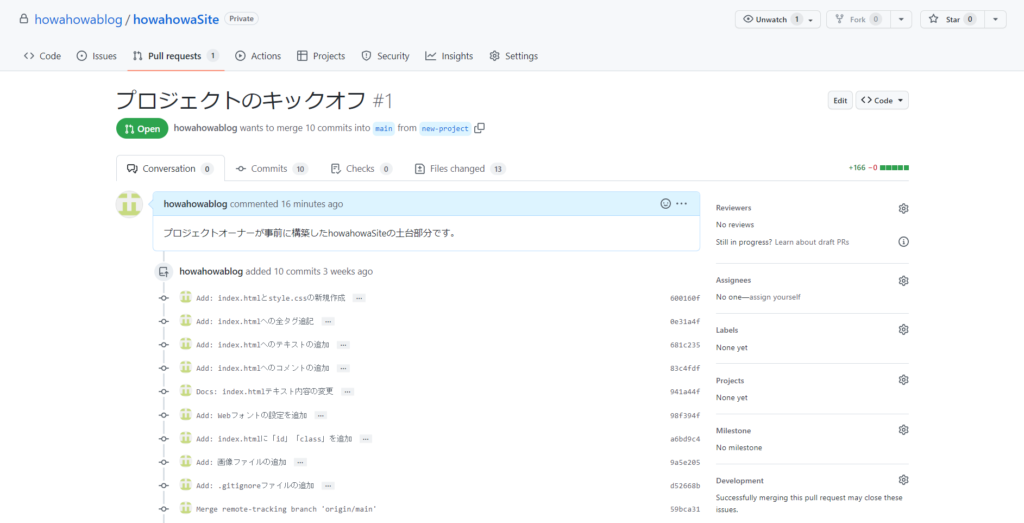
Once you have finished your local work and pushed the branch, you submit a request to the project manager to make changes to the remote repository. This is a pull request. The pull request is reviewed, and if there are no problems, the changes are merged into the remote repository.
Click “Compare & pull request” to make a pull request. Clicking “Compare & pull request” will take you to the next page.
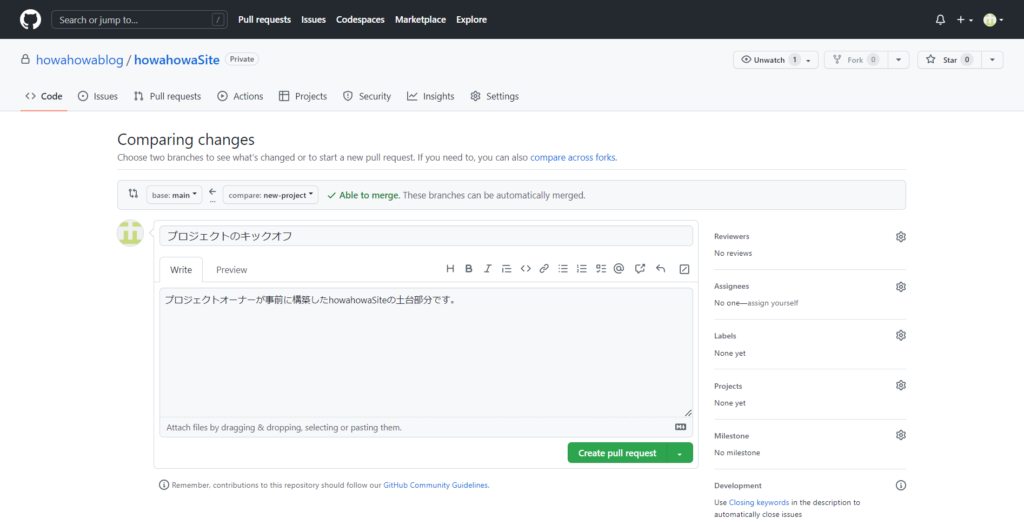
設定・入力の項目は次のようになっています。
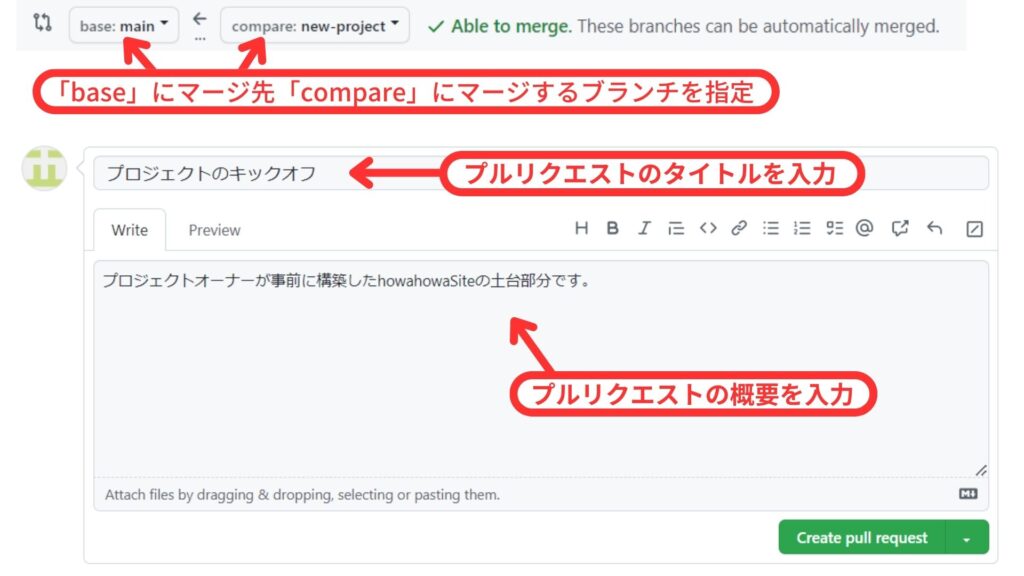
【English translation in illustration】
「base」にマージ先「compare」にマージするブランチを指定
→Specify the branch that accepts merges in “base” and the branch to merge in “compare
プルリクエストタイトル → Pull request title.
プルリクエスト概要を入力 → Enter the pull request summary.
base:A branch that accepts merges in the remote repository.
This book selects main.
compare:Select the topic branch you pushed.
This time, the new-project branch is selected.
title:Enter the title of the pull request.
Write:プルリクエストの概要を入力します。
Enter a summary of the pull request.
※At this point, merge is not yet performed.
Approve a pull request and bring the remote repository up to date (synchronization)
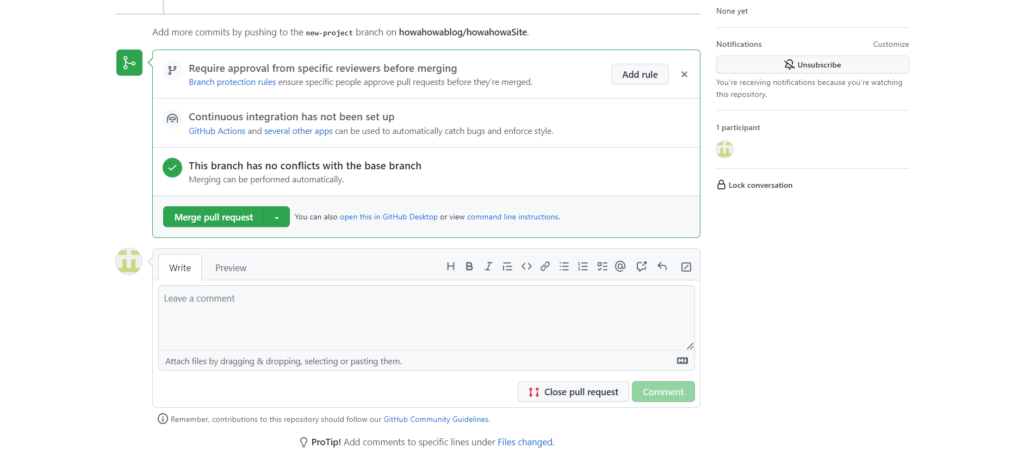
Click “Merge pull request” to merge the “topic branch” pushed to the GitHub side into the “main branch”.
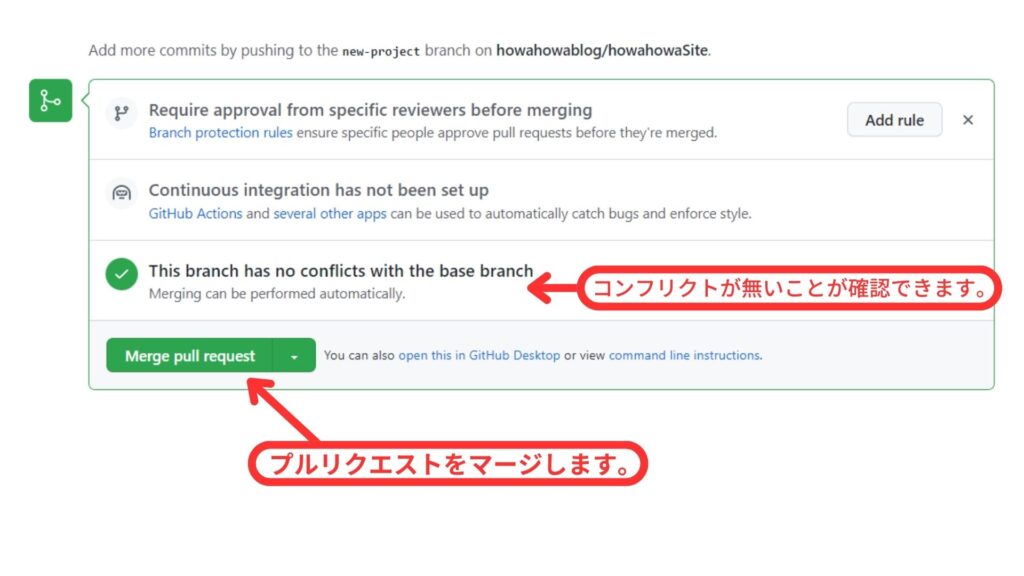
【English translation in illustration】
コンフリクトが無いことが確認できます。 → You can confirm that there are no conflicts.
プルリクエストをマージします。 → Merge pull requests.
When the confirmation screen appears, click “Confirm merge” if there are no problems.
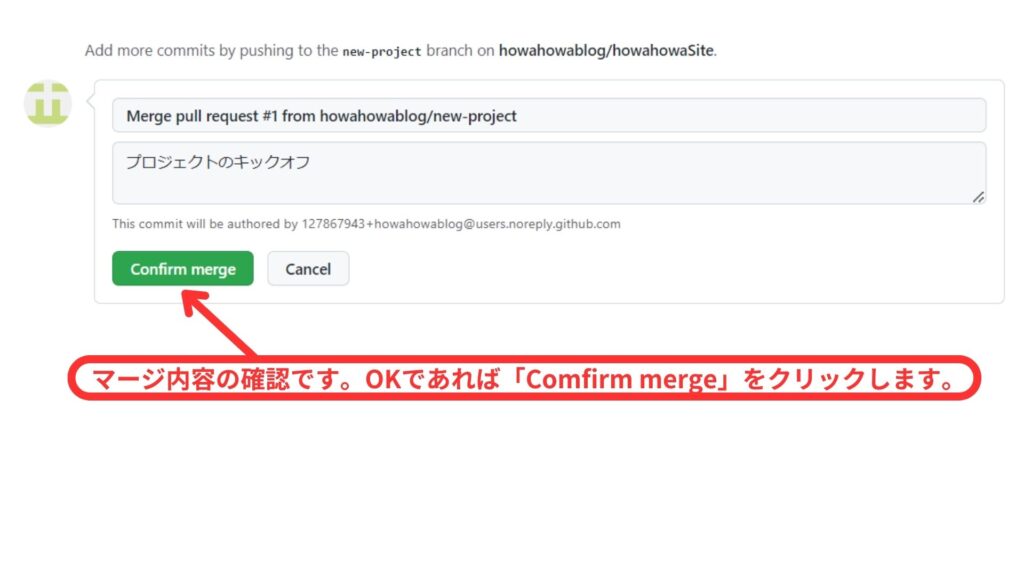
【English translation in illustration】
マージ内容の確認です。OKであれば「Confirm merge」をクリックします。
→This is a confirmation of the merge contents. If all is well, click “Confirm Merge”.
In GitHub, merging can be done with only a click of a button. If the screen changes as follows, the merge is complete.
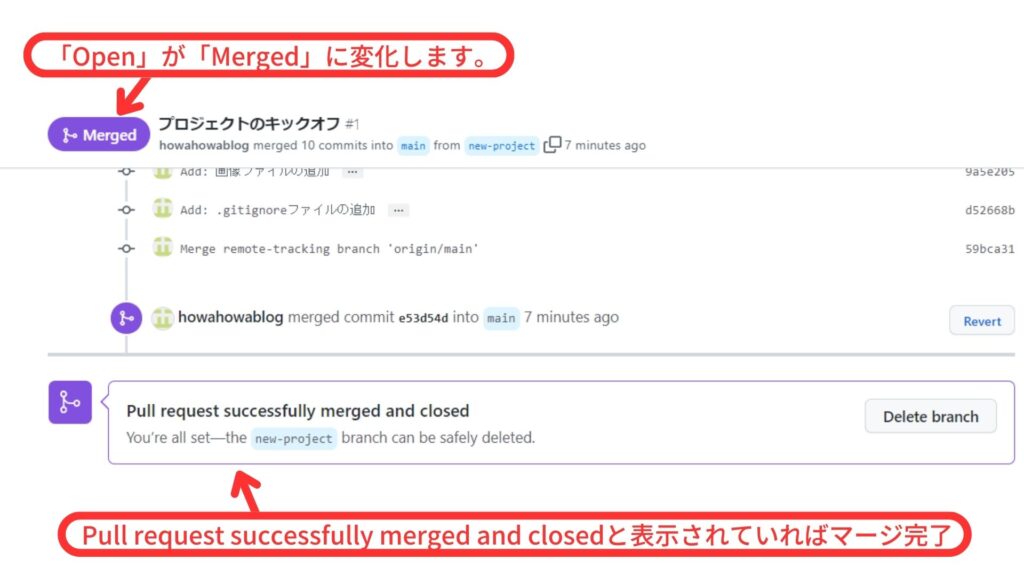
【English translation in illustration】
「Open」が「Merged」に変化します。
→”Open” will change to “Merged”.
Pull request successfully merged and closeと表示されていればマージ完了
→If the message “Pull request successfully merged and closed” is displayed, the merge is complete.
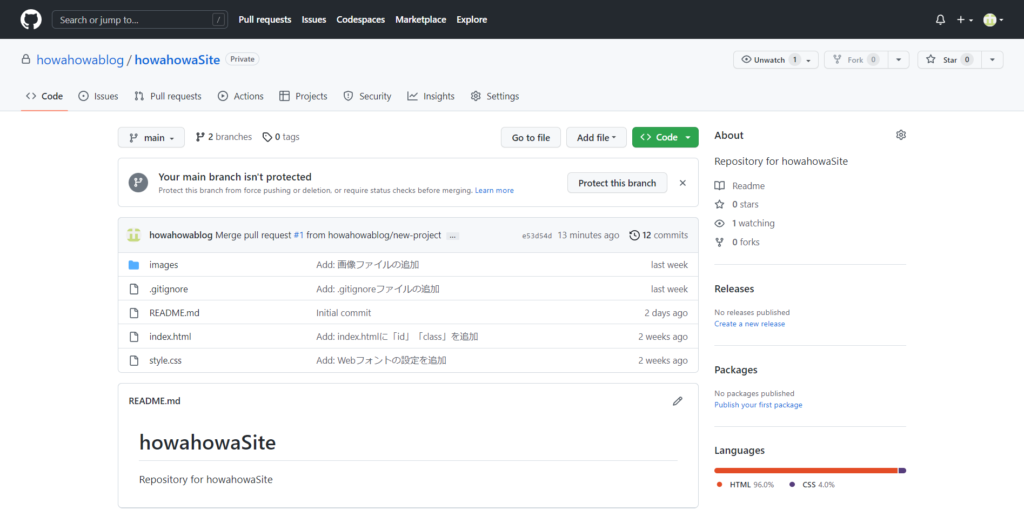
If you go to the GitHub “howahowaSite” page, the contents are as follows.
※”howahowaSite” page should be replaced with your own page.
That’s all for this article.

ブックマークのすすめ
「ほわほわぶろぐ」を常に検索するのが面倒だという方はブックマークをお勧めします。ブックマークの設定は別記事にて掲載しています。



-640x360.jpg)

-320x180.jpg)
-320x180.jpg)
-320x180.jpg)