Version Control (Part1-Part.11) [Git] articles are available on Amazon kindle Unlimited (e-book).
howahowablog.com will only be able to read Part.5/10/11.
Version Control (Parts 12-21) [GitHub (Part 1)] articles are available on Amazon kindle Unlimited (e-book).
Only part15/19 will be available on howahowablog.com.
Version Control (Part 21-Part.30) [GitHub (Part 2)] articles are available on Amazon kindle Unlimited (e-book).
Only Part.24/30 will be available on howahowablog.com.
Objectives of Chapter 10
Understand how to rename files/directories within Git-managed directory.
Understand how to delete files within a Git-managed directory.
Understand how to delete directories within Git-managed directory.
Commands used in this book.
Understand and be able to use the “git mv” command.
Understand and be able to use the “git rm” command.
Understand and be able to use the “-r” option of the “git rm” command.
Manipulate files in Git-managed Directory (Preparation)
Add materials from Explorer to a Git-managed directory
Add materials from Explorer to a Git-managed directory
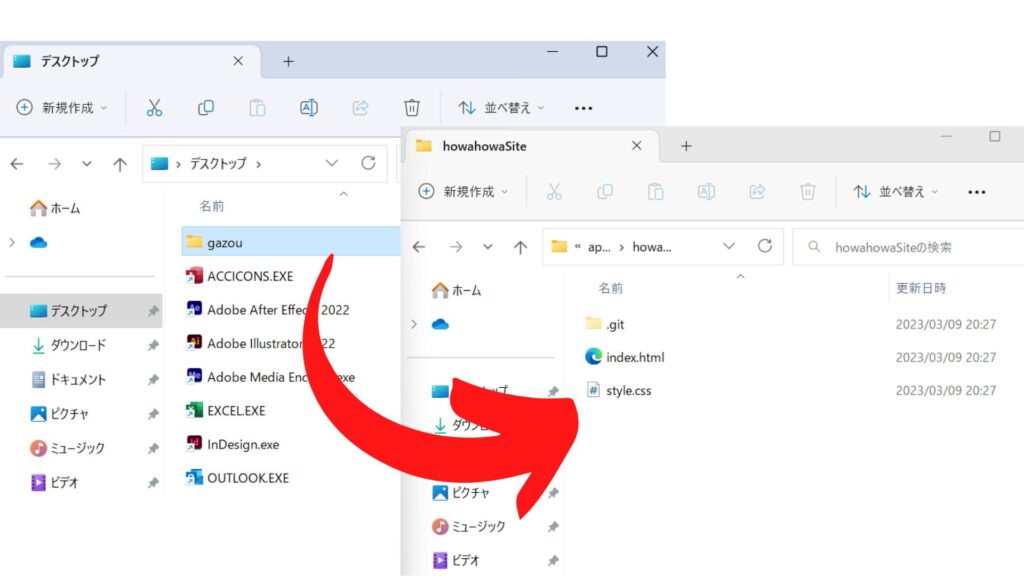
Move the folder containing the images to be used in howahowaSite from Explorer to the Git-managed directory.
In this book, we created a “gazou” folder on the desktop. In this folder, we prepared some free materials. (Figure below: Contents of the “gazou” folder)
※We use free materials that can be used for commercial purposes.

Drag and drop this “gazou” folder into the directory under Git management.

After moving the “gazou” folder, the Git-Managed Directory (howahowaSite directory) will look like this.

Check the status of the “gazou” folder (directory) and the files in it in Visual Studio Code. All files are “untracked”.

Add the “gazou” directory to the staging area.
Type “git add gazou”. The status of the directory and all image files will be “Added”.

Continue with the following operations
- Rename a file/directory within a Git-managed directory
- Delete a file within a Git-managed directory
- Delete a directory within a Git-managed directory
Manipulating files in Git-Managed Directory
Manipulating Files/Directories in Git-Managed Directory
Overview of “git mv” command and “git rm” command
When renaming or deleting files/directories within a directory under Git management, you need to “operate in the worktree” and “register in the staging area” at the same time (maintaining Git’s tracking).
The “git mv” or “git rm” commands perform these operations simultaneously.
Renaming Files in the Git-Managed Directory
How to use the “git mv” command
The “git mv” command is for moving files. It moves a file from <current location> to <new location>.
This move command can also be used to rename a file. Usage is written as <current location> to <another name in the same location as the current location>.
| Command | Meaning |
| git mv <current filename><new filename> git mv <current filename><destination filename> | Rename file to new name Move file to destination |
| git mv <current directory name><new directory name> git mv <current directory name><destination directory name> | Rename directory Move directory to destination |
| git mv -n <current filename><new filename> git mv -n <current directory name><new directory name> ※The “-n” option allows you to check the schedule of changes without making the actual change. ※The “n” option can also be used as “-dry-run” for the same operation. | View results after changes |
Using the “git mv” command
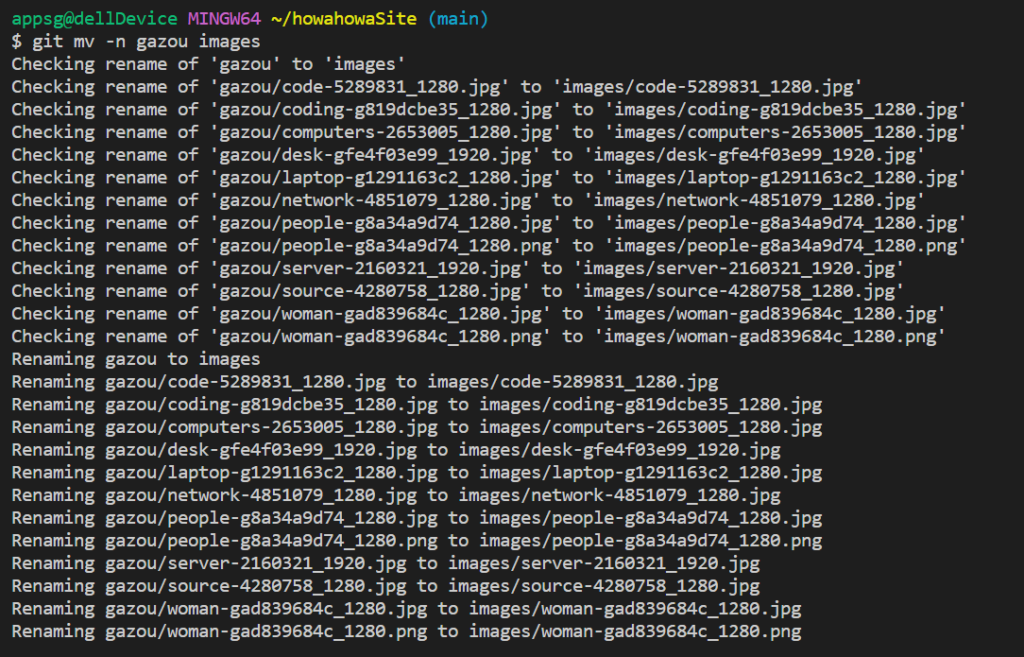
Here, We will rename the “gazou” directory to the “images” directory. At first, use the option “-n” to confirm the result of the change. Once confirmed, we will rename the directory.
In “Git Bush”, type “git mv -n gazou images”.

After reviewing the contents, make the following changes.
In “Git Bush”, type “git mv gazou images”.

The status will remain “Added” and the directory name will change to “images”.

Delete files within the Git-Managed Directory
How to use the “git rm” command
| Command | Meaning |
| git rm <filename> | Delete file |
| git rm -n <filename> ※The “-n” option allows you to check the schedule of changes without making the actual change. ※The “n” option can also be used as “-dry-run” for the same operation. | View results after changes |
We will now delete two “png files” in the “images” directory as an exercise.
The first is to use the option “-n” to confirm the result of the change (confirm the files to be deleted). Once confirmed, delete the files.
This time, since the files are already staged, add the option “-f (force)” to be used. (Without “-f”, an error will occur)
Using the “git rm” command
In “Git Bush”, type “git rm -nf images/woman-gad839684c_1280.png”.

Now that we have identified the file to be deleted, we will process the deletion.
Type the history (“↑” up on the keyboard) in “Git Bush”.
The “git rm -nf images/woman-gad839684c_1280.png” you just typed will appear, delete the “n” and press Enter.

The file “woman-gad839684c_1280.png” will be deleted from the “images” directory.

Delete directories within Git-Managed Directory
Option “-r” in the “git rm” command
| git rm -r <directory name> | Delete file |
| git rm -rn < directory name > ※The “-n” option allows you to check the schedule of changes without making the actual change. ※The “n” option can also be used as “-dry-run” for the same operation. | View results after changes |
Next, delete the other “png file” in the “images” directory.
This time, after creating a directory called “bindir” in the “images” directory, move this file into it, and then delete the entire “bindir” directory.
Again, use the “-n” option to confirm the results of the change before deleting the file.
After confirmation, delete the file. When deleting, add “-f (force)” to the options. (Without “-f”, an error will occur).)
Use the “mkdir” command to create the directory.
In “Git Bush”, type “mkdir images/bindir”.

A “bindir” directory is created in the “images” directory.

Moving a file with the “mv” command
In “Git Bush”, type “git mv -n images/people-g8a34a9d74_1280.png images/bindir/people-g8a34a9d74_1280.png”. You will see the contents as follows.

Move the file.
In “Git Bush”, type “git mv images/people-g8a34a9d74_1280.png images/bindir/people-g8a34a9d74_1280.png”.

You can also see the result of the file being moved in Visual Studio Code’s Explorer.

Using the “-r” option of the “git rm” command
Delete the folder with the “-r” option to the git rm command.
In “Git Bush”, type “git rm -nrf images/bindir”. You will see that it has been removed.

In “Git Bush” type “git rm -rf images/bindir” to delete the directory.

You can also see the directory deletion in Visual Studio Code’s Explorer.

That’s all for this article. Next time, we will discuss .gitignore settings.

ブックマークのすすめ
「ほわほわぶろぐ」を常に検索するのが面倒だという方はブックマークをお勧めします。ブックマークの設定は別記事にて掲載しています。


-640x360.jpg)

-640x360.jpg)
-640x360.jpg)


カスタム調査とシンジケートデータ-320x180.png)
帰無仮説と対立仮設・有意水準・P値・z検定-320x180.png)
準実験:合成コントロール法-320x180.jpg)
準実験:回帰不連続デザイン(RDD)-320x180.jpg)
準実験:傾向スコアマッチング(PSM)-320x180.jpg)