Version Control (Part1-Part.11) [Git] articles are available on Amazon kindle Unlimited (e-book).
howahowablog.com will only be able to read Part.5/10/11.
Version Control (Parts 12-21) [GitHub (Part 1)] articles are available on Amazon kindle Unlimited (e-book).
Only part15/19 will be available on howahowablog.com.
Version Control (Part 21-Part.30) [GitHub (Part 2)] articles are available on Amazon kindle Unlimited (e-book).
Only Part.24/30 will be available on howahowablog.com.
Objectives of Chapter 5
Understand about the folder managed by Git.
Understand the important area of version control, “worktree”.
Understand the important area in version control, “staging area”.
Understand the important area for version control,”local repository”.
Confirm the sample site to be created while performing version control in this book.
Folders and Three areas in it managed by “Git”
Overview of the folder managed by “Git”
After setting up a username and e-mail address in Git, the next step is to create a folder to be used for version control.
Once you have created the folder, you will place it under Git’s control.
When this process is complete, you will have created a “work tree”, “staging area” and “local repository” in a folder managed by Git.
- “Create the folder.”
- “Place the folder under Git’s control.”
- Once the folder is under Git’s control, the following happens.
- ‘A file edit area’ is created.
(working tree) - ‘A temporary storage area for edited files’ is created.
(staging area) - ‘A version control repository’ is created.
(Local Repository)
To have Git manage folders, use the “git init ” command.
When you use the “git init” command, “.git” is created in the specified folder (directory). This “.git” file contains functions to monitor the folder.
Overview of three important areas in “Git”
Overview chart of three important areas in Git
-1024x576.jpg)
【English translation of speech bubbles】
git init コマンドを利用すると指定したフォルダはGitの管理対象となり、3つのエリアが準備されます。
→When you use the “git init” command, the folder you specify becomes the target of Git’s management, and three areas are prepared.
【English translation in illustration】
ワークツリー(ワーキングツリー)
→worktree (working directory)
ステージングエリア
→Staging Area
ローカルリポジトリ
→local repository
WorkTree (Working Directory)
What is a worktree (working directory)
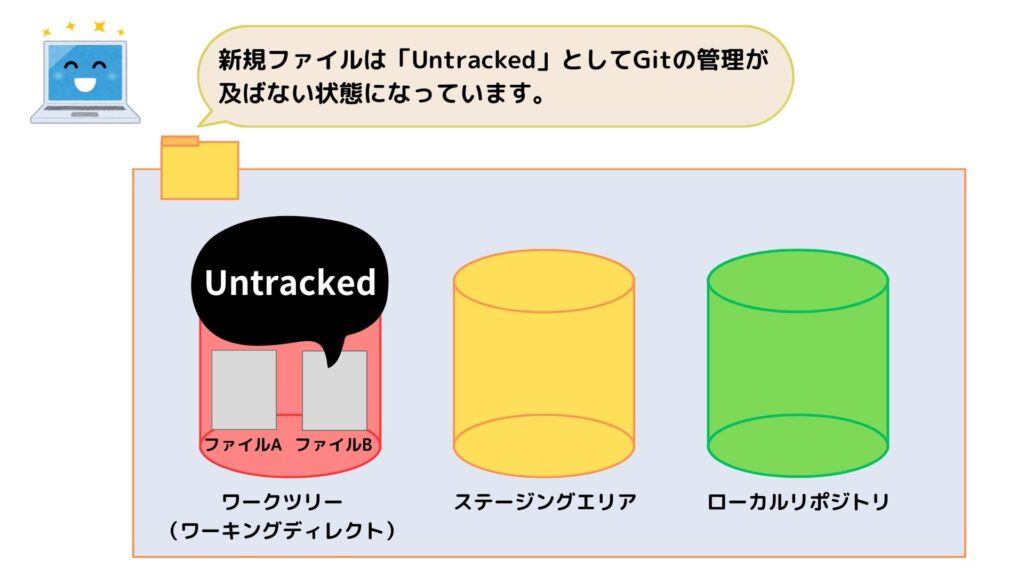
The worktree is prepared as a space for editing files.
Files read from the repository (local repository) are edited in this area.
You can also create and edit new files.

【English translation of speech bubbles】
新規ファイルは「Untracked」としてGitの管理が及ばない状態になっています。
→New files are “Untracked”, which means that they are out of Git’s control.
※In the illustration above, file B is a new file.
【English translation in illustration】
ファイルA→fileA, ファイルB→fileB
ワークツリー(ワーキングツリー)
→worktree (working directory)
ステージングエリア
→Staging Area
ローカルリポジトリ
→local repository
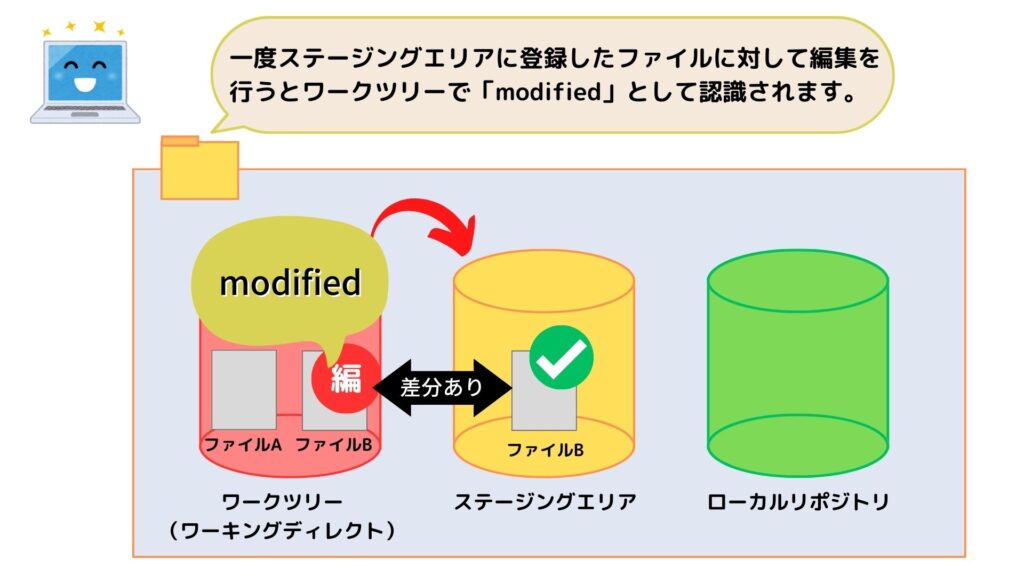
To add the file to Git’s control, register it to the staging area. The file registered in the staging area will then have the status of “modified” in the work tree while it is being edited.
In the figure below, “File B” registered in the staging area will have a difference when you start editing it in the worktree. This difference will cause the status of “File B” to be set as “modified”.

【English translation of speech bubbles】
一度ステージングエリアに登録したファイルに対して編集を行うとワークツリーで「modified」として認識されます。
→Once a file is registered in the staging area, it is recognized as “modified” in the work tree when it is edited.
【English translation in illustration】
差分あり
→There is a difference
編(「編集」の先頭の漢字)
→compilation (Kanji at the top of the edit)
Staging Area
Staging Area
The staging area is an area for temporary storage of files edited in the worktree.
In version control, after editing a file in the worktree, it is stored in the staging area and finally registered in the repository (local repository).
This procedure allows multiple file changes to be registered in the local repository as a single update. For example, suppose you have the following three development items: “Feature A”, “Feature B”, and “Feature C “.
-2-1024x576.jpg)
【English translation of speech bubbles】
ワークツリーで複数のファイルを編集した場合は、リポジトリに登録したい単位でステージングエリアにファイルをまとめます。
→If you have edited multiple files in the work tree, add only those files that should be registered in the repository to the staging area.
【English translation in illustration】
機能A→functionA, 機能B→functionB
Local Repository
Local Repository
This is the area where files added to the staging area are registered through a “commit operation”.
When committing, it is necessary to leave a “message” indicating what changes have been made.

【English translation of speech bubbles】
ステージングエリアにまとめたファイルをコミットするとローカルリポジトリへ登録が行えます。この時、コミットメッセージの入力が必要となります。
→You can register files in the local repository by committing the files you have compiled in the staging area. At this time, enter the commit message.
機能Bのファイルとメッセージの追加
→Adding Files and Messages in Function B
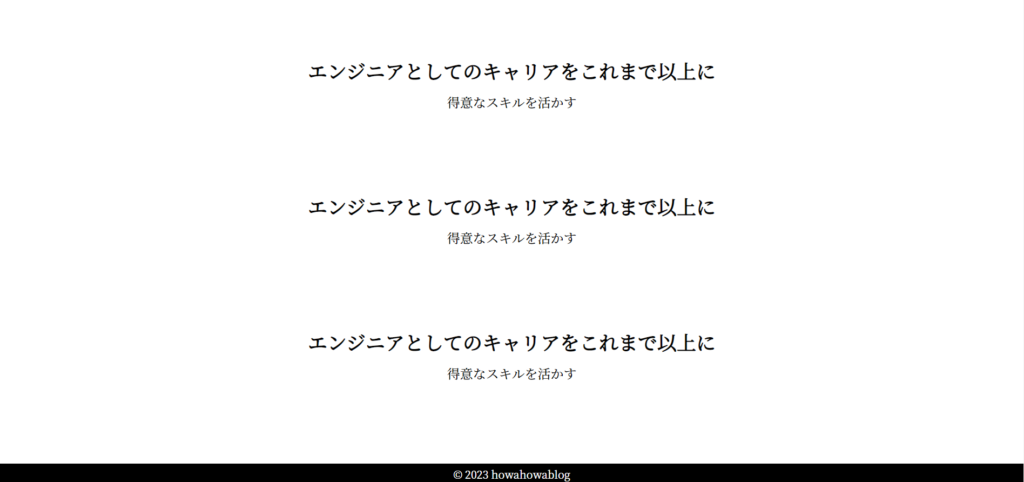
Sample sites to be created using version control
From the next section, you will practice Git operations while creating a sample site. In this section, we will check the appearance of the sample site we will create.。


That’s all for this article. In the next article, we will create a local repository in Git Bush and perform operations up to commit.

ブックマークのすすめ
「ほわほわぶろぐ」を常に検索するのが面倒だという方はブックマークをお勧めします。ブックマークの設定は別記事にて掲載しています。


-640x360.jpg)

-640x360.jpg)

